Create a simple Starknet dapp
In this tutorial, you'll learn how to set up a React TypeScript dapp that uses the get-starknet library to connect to MetaMask and display the user's wallet address.
You'll also display the balance of an ERC-20 token and perform a token transfer.
Prerequisites
- MetaMask installed
- A text editor (for example, VS Code)
- Node version 20.11 or later
- Yarn
This tutorial uses get-starknet version 3.3.0 and starknet.js version 6.11.0.
1. Set up the project
1.1 Create a new project
Use Create React App to set up a new React project with TypeScript.
Create a new project named get-starknet-tutorial:
yarn create react-app get-starknet-tutorial --template typescript
Change into the project directory:
cd get-starknet-tutorial
1.2 Configure Yarn
Configure Yarn to use the node-module linker instead of its default linking strategy:
yarn config set nodeLinker node-modules
2. Add get-starknet and starknet.js
Add get-starknet version 3.3.0 and starknet.js
version 6.11.0 to your project's dependencies:
yarn add get-starknet@3.3.0 starknet@6.11.0
Your file structure should look similar to the following:
get-starknet-tutorial/
├── public/
│   ├── index.html
│   └── ...
├── src/
│   ├── App.tsx
│   ├── index.tsx
│   ├── App.css
│   └── ...
└── ...
3. Configure the wallet connection
3.1. Connect to MetaMask
The connect function from get-starknet is the primary way to connect your dapp to a user's MetaMask wallet.
It opens a connection to MetaMask and returns an object containing important details about the wallet, including:
name: The name of the wallet.icon: The wallet's icon, which displays the wallet's logo.account: The account object fromstarknet.js, which contains the wallet's address and provides access to account-specific operations.
To import the necessary functions and connect to a wallet, add the following code to src/App.tsx:
import { connect, type ConnectOptions } from "get-starknet";

async function handleConnect(options?: ConnectOptions) {
  const res = await connect(options);
  // Access wallet details such as name, address, and icon
  console.log(res?.name, res?.account?.address, res?.icon);
}
3.2. Configure connection options
connect accepts an optional ConnectOptions object.
This object can control the connection process, including:
modalMode: Determines how the connection modal behaves. The options are:"alwaysAsk": Prompts the user every time a connection is initiated."neverAsk": Attempts to connect without showing the modal.
modalTheme: Sets the visual theme of the connection modal. The options are"dark"and"light".
You can configure these options as follows:
handleConnect({ modalMode: "alwaysAsk", modalTheme: "dark" });
3.3. Create an AccountInterface
After connecting to MetaMask, the account instance is present in the returned object from the connect function.
This object allows interaction with the Starknet network using the connected wallet.
import { AccountInterface } from "starknet";

async function handleConnect(options?: ConnectOptions) {
  const res = await connect(options);
  const myFrontendProviderUrl = "https://free-rpc.nethermind.io/sepolia-juno/v0_7";
  const newAccountInterface = new AccountInterface({ nodeUrl: myFrontendProviderUrl }, res);
}
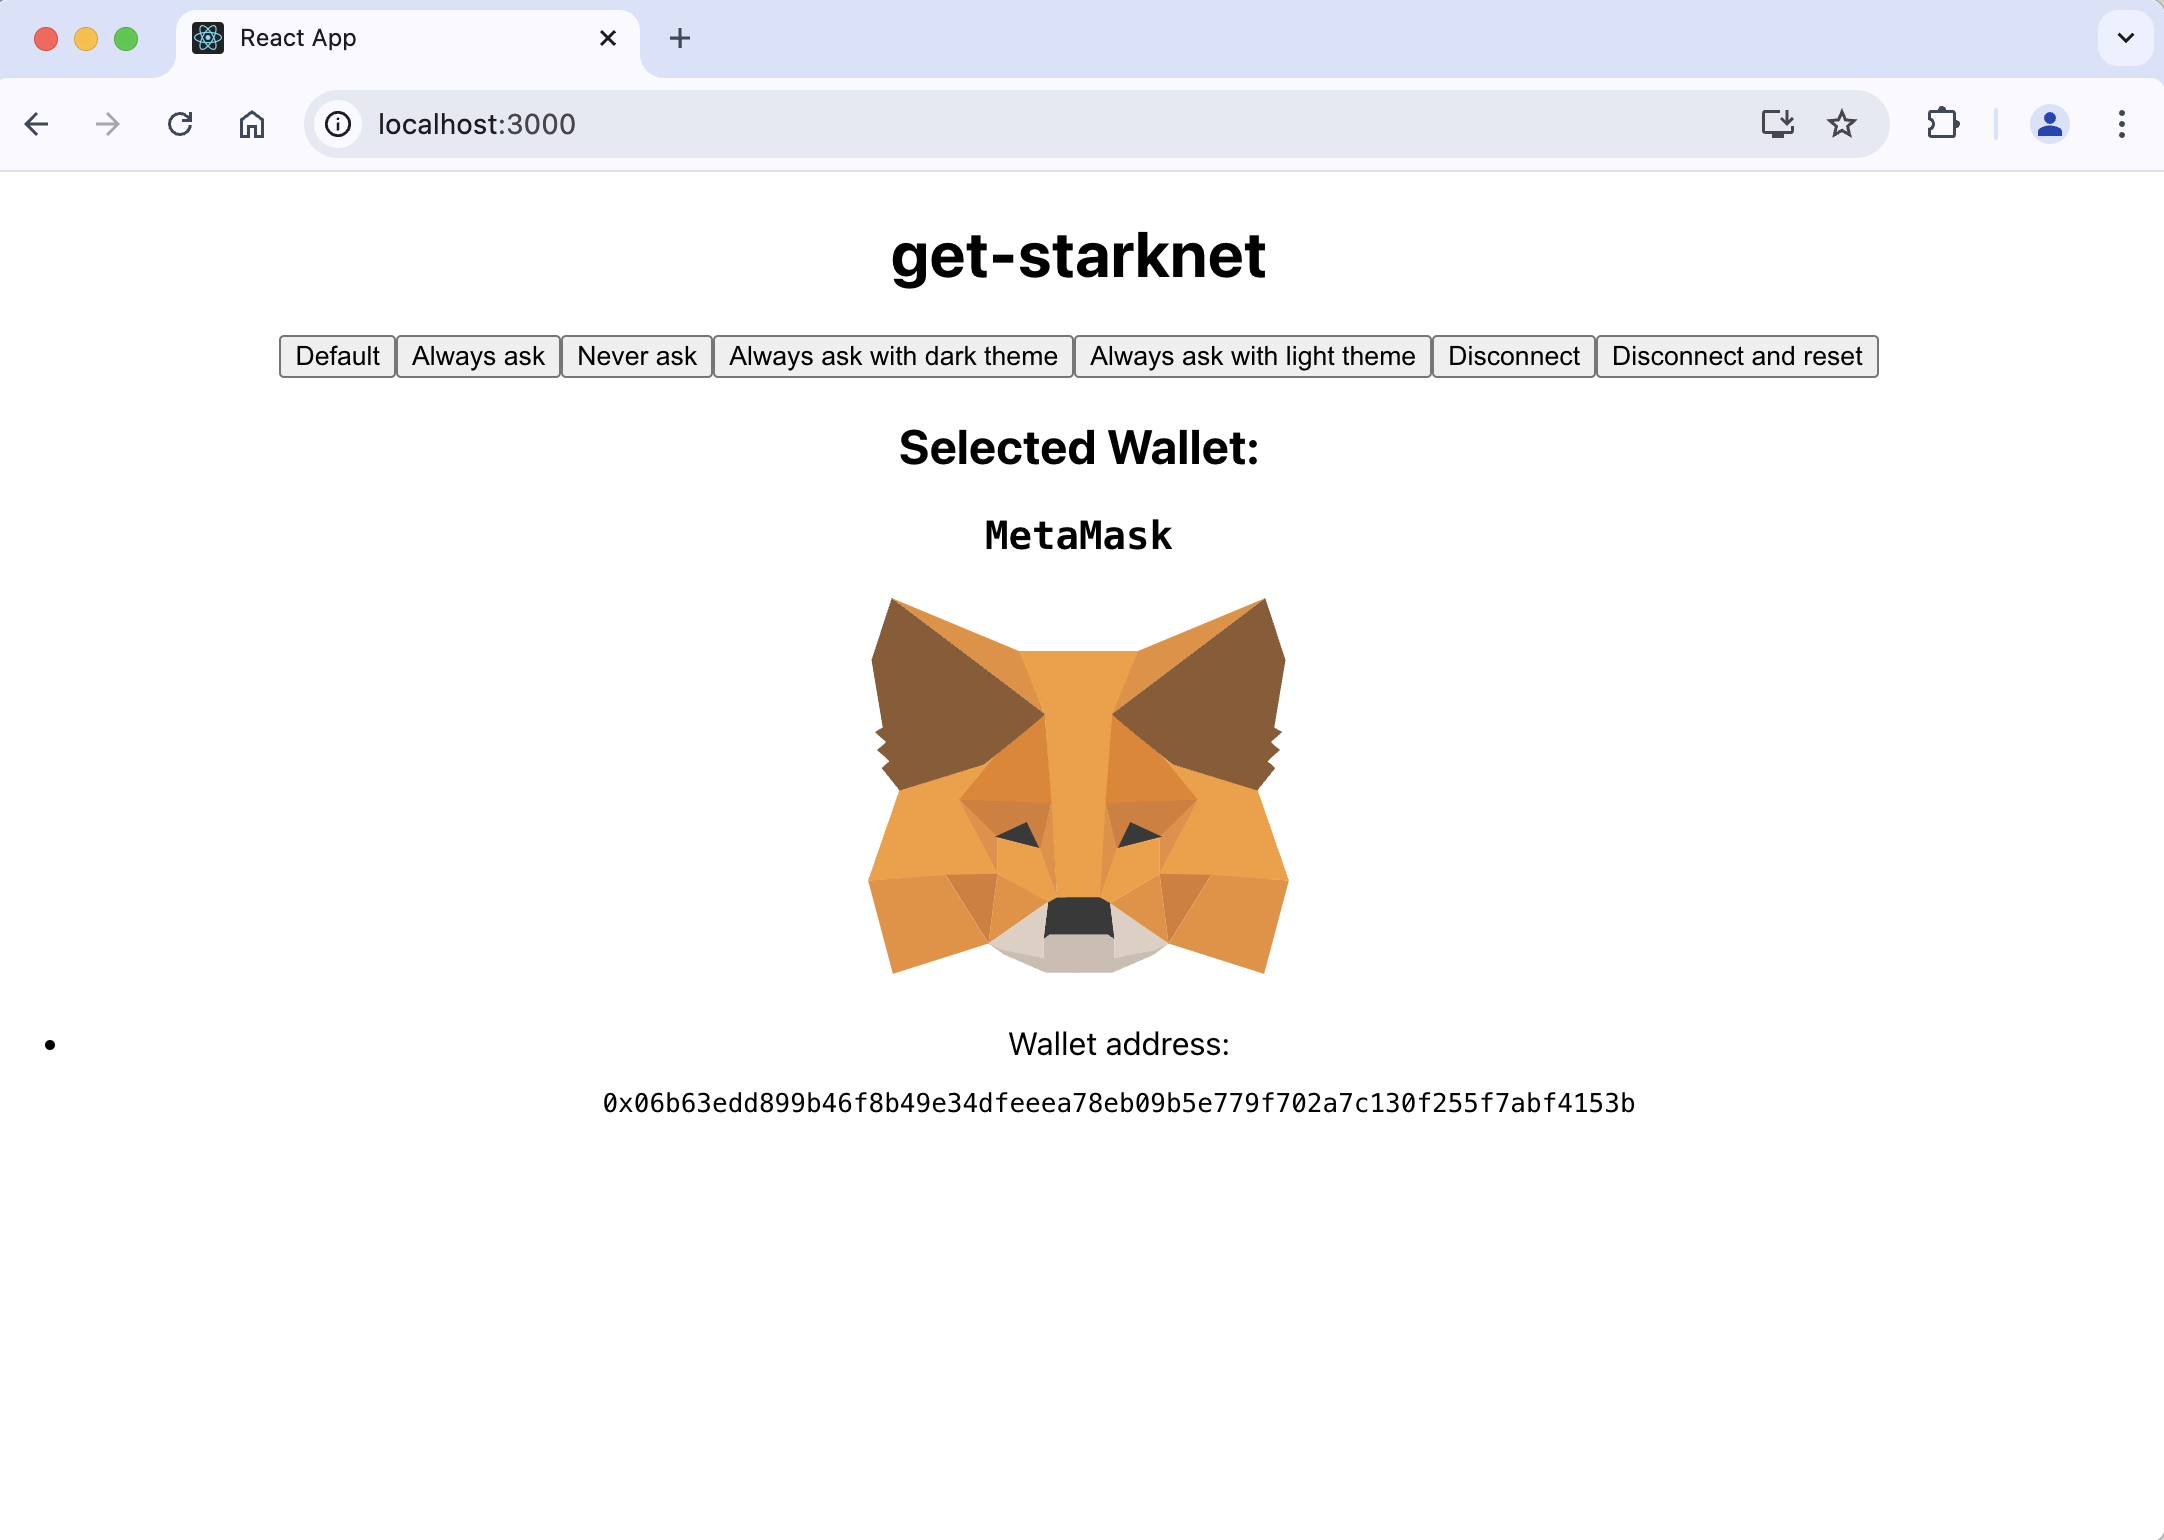
3.4. Display wallet information
You can display the wallet's name, address, and icon in your dapp. This provides visual feedback to the user, confirming which wallet they are using.
The following code is an example of how to update the interface with the connected wallet's details:
import { useState } from "react";

function App() {
  const [walletName, setWalletName] = useState("");
  const [walletAddress, setWalletAddress] = useState("");
  const [walletIcon, setWalletIcon] = useState("");

  async function handleConnect(options?: ConnectOptions) {
    const res = await connect(options);
    setWalletName(res?.name || "");
    setWalletAddress(res?.account?.address || "");
    setWalletIcon(res?.icon || "");
  }

  return (
    <div>
      <h2>Selected Wallet: {walletName}</h2>
      <p>Address: {walletAddress}</p>
      <img src={walletIcon} alt="Wallet icon" />
    </div>
  );
}
3.5. Full example
The following is a full example of configuring the wallet connection:
import "./App.css"
import {
  type ConnectOptions,
  type DisconnectOptions,
  connect,
  disconnect,
} from "get-starknet"
import { AccountInterface } from "starknet";
import { useState } from "react"
function App() {
  const [walletName, setWalletName] = useState("")
  const [walletAddress, setWalletAddress] = useState("")
  const [walletIcon, setWalletIcon] = useState("")
  const [walletAccount, setWalletAccount] = useState<AccountInterface | null>(null)
  async function handleConnect(options?: ConnectOptions) {
    const res = await connect(options)
    setWalletName(res?.name || "")
    setWalletAddress(res?.account?.address || "")
    setWalletIcon(res?.icon || "")
    setWalletAccount(res?.account)
  }
  async function handleDisconnect(options?: DisconnectOptions) {
    await disconnect(options)
    setWalletName("")
    setWalletAddress("")
    setWalletAccount(null)
  }
  return (
    <div className="App">
      <h1>get-starknet</h1>
      <div className="card">
        <button onClick={() => handleConnect()}>Default</button>
        <button onClick={() => handleConnect({ modalMode: "alwaysAsk" })}>
          Always ask
        </button>
        <button onClick={() => handleConnect({ modalMode: "neverAsk" })}>
          Never ask
        </button>
        <button
          onClick={() =>
            handleConnect({
              modalMode: "alwaysAsk",
              modalTheme: "dark",
            })
          }
        >
          Always ask with dark theme
        </button>
        <button
          onClick={() =>
            handleConnect({
              modalMode: "alwaysAsk",
              modalTheme: "light",
            })
          }
        >
          Always ask with light theme
        </button>
        <button onClick={() => handleDisconnect()}>Disconnect</button>
        <button onClick={() => handleDisconnect({ clearLastWallet: true })}>
          Disconnect and reset
        </button>
      </div>
      {walletName && (
        <div>
          <h2>
            Selected Wallet: <pre>{walletName}</pre>
            <img src={walletIcon} alt="Wallet icon"/>
          </h2>
          <ul>
            <li>Wallet address: <pre>{walletAddress}</pre></li>
          </ul>
        </div>
      )}
    </div>
  )
};

export default App
3.6. Start the dapp
Start the dapp and navigate to it in your browser.
yarn start
You are directed to the default dapp display.
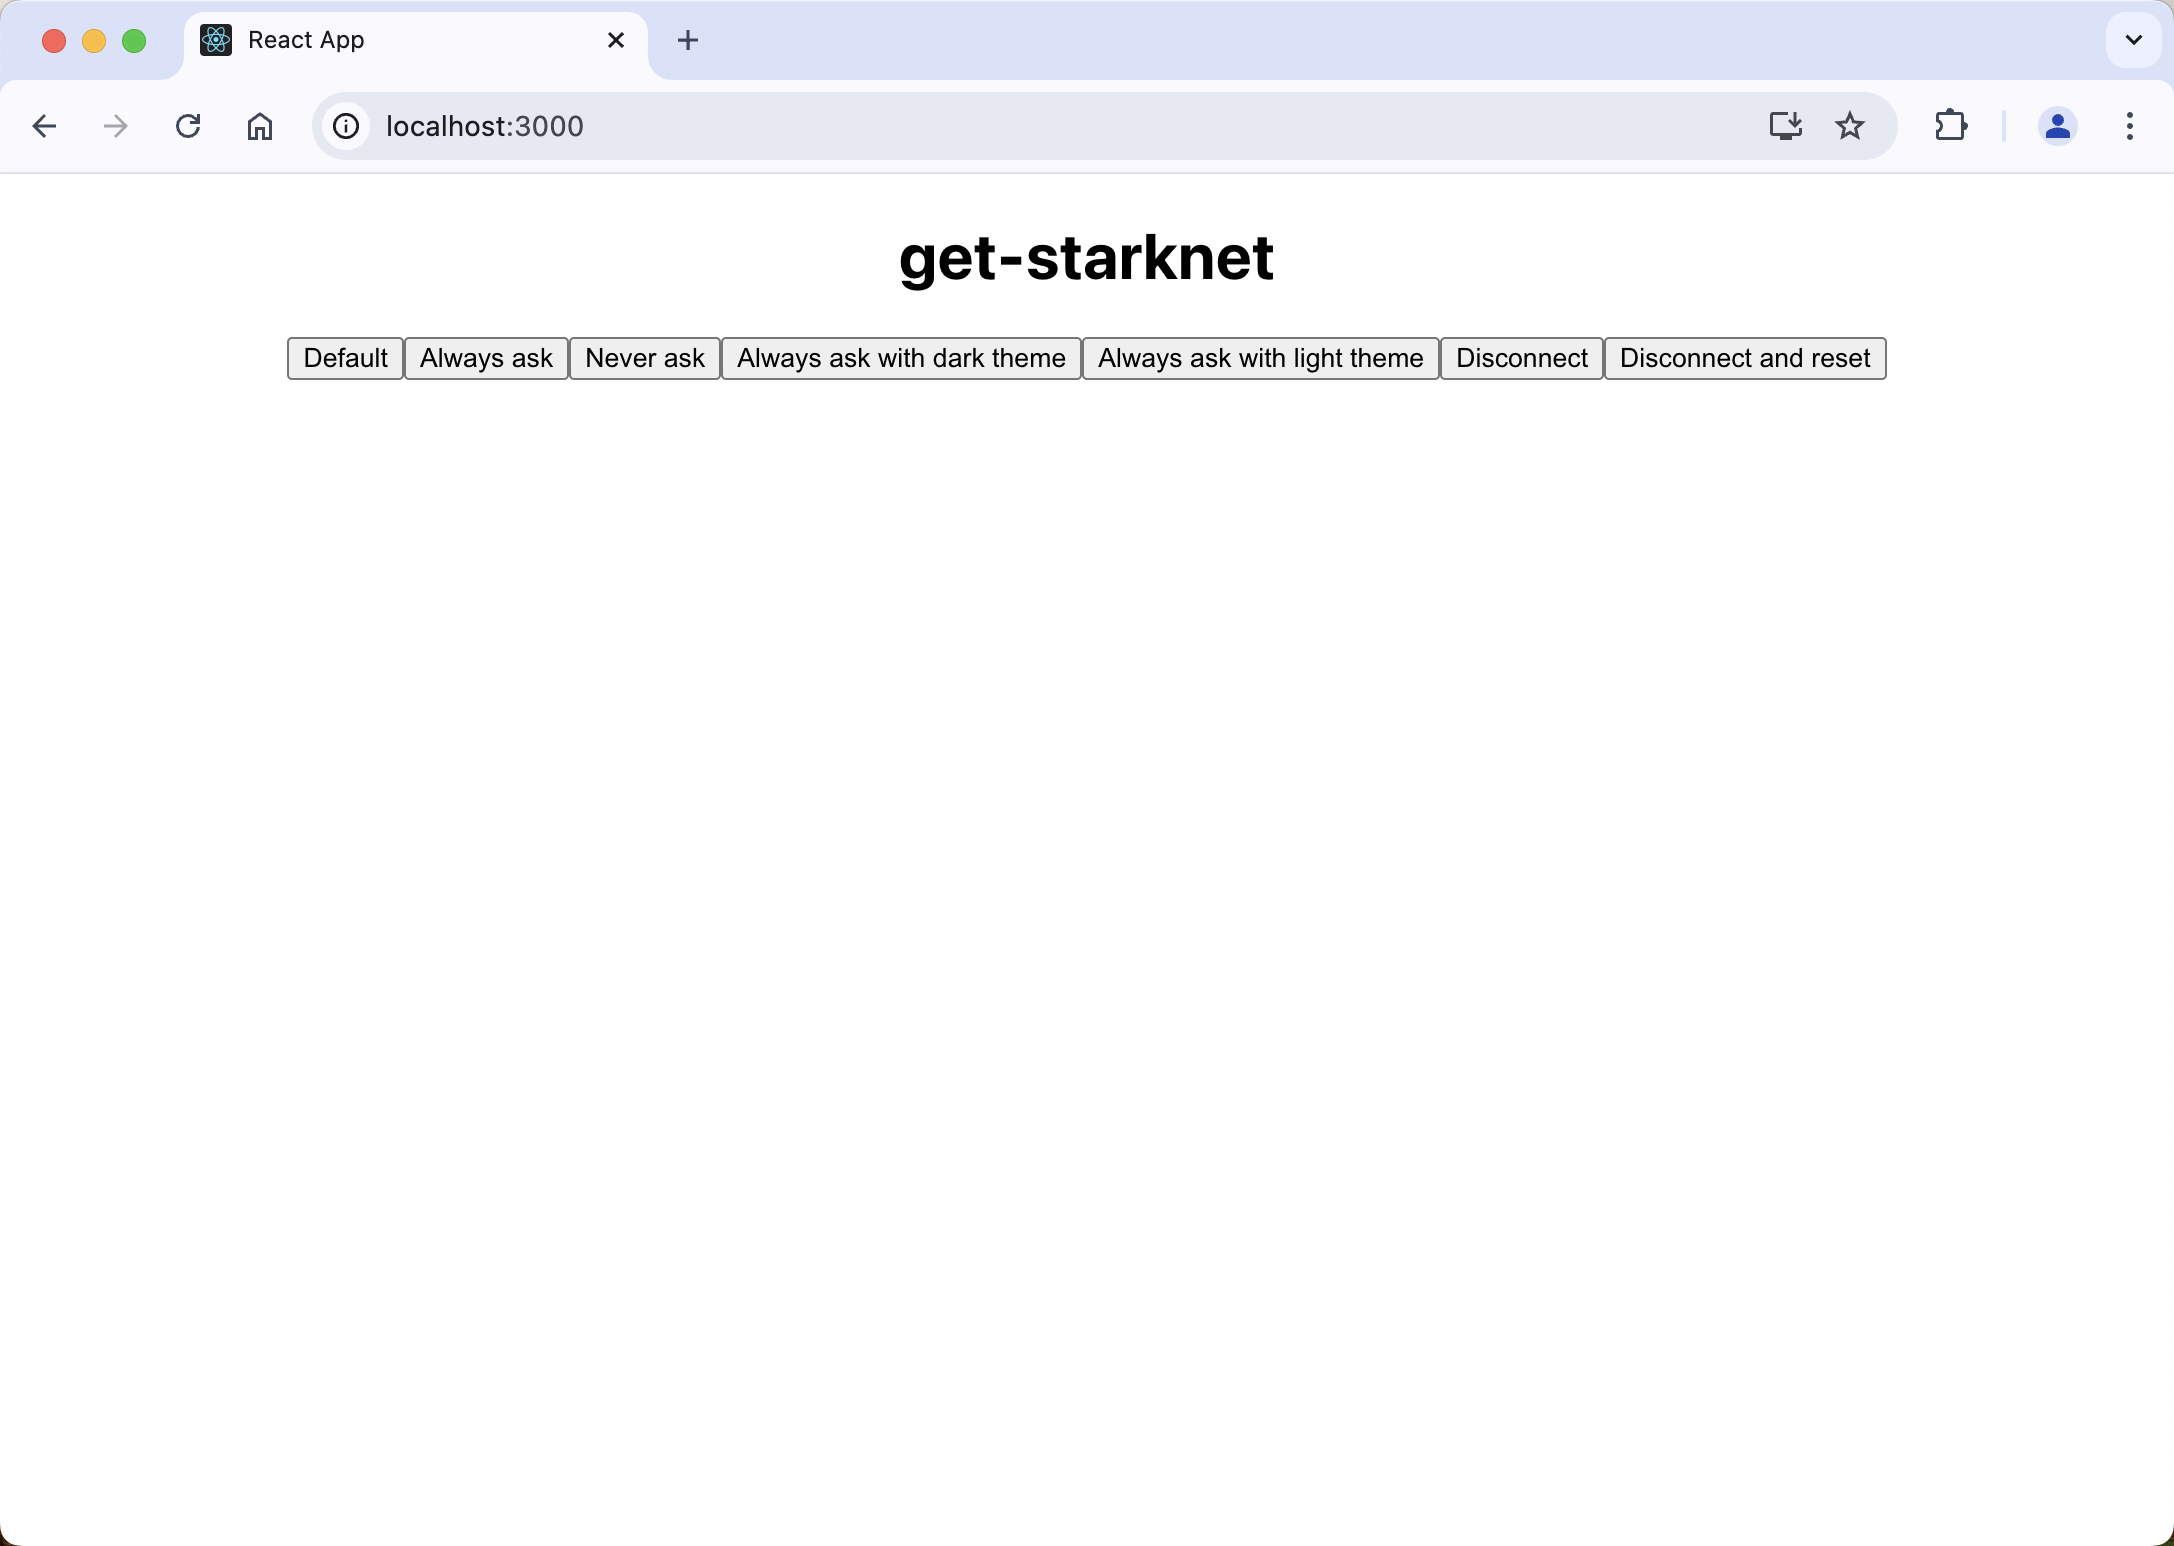
- Default: Resets the app's handling to the default behavior for connecting the wallet to Starknet.
- Always ask: Always prompts the user for confirmation when the wallet is connecting to Starknet.
- Never ask: Suppresses confirmation prompts, automatically connecting the wallet to Starknet.
- Always ask with dark theme: Prompts for wallet connection confirmation with a dark-themed user interface.
- Always ask with light theme: Prompts for wallet connection confirmation with a light-themed user interface.
- Disconnect: Disconnects the wallet from Starknet.
- Disconnect and reset: Disconnects the wallet and resets the app’s wallet connection settings.
3.7 Connect your dapp to a wallet
Select your preferred connection option and follow the on-screen prompts to connect your MetaMask wallet to the Starknet network.
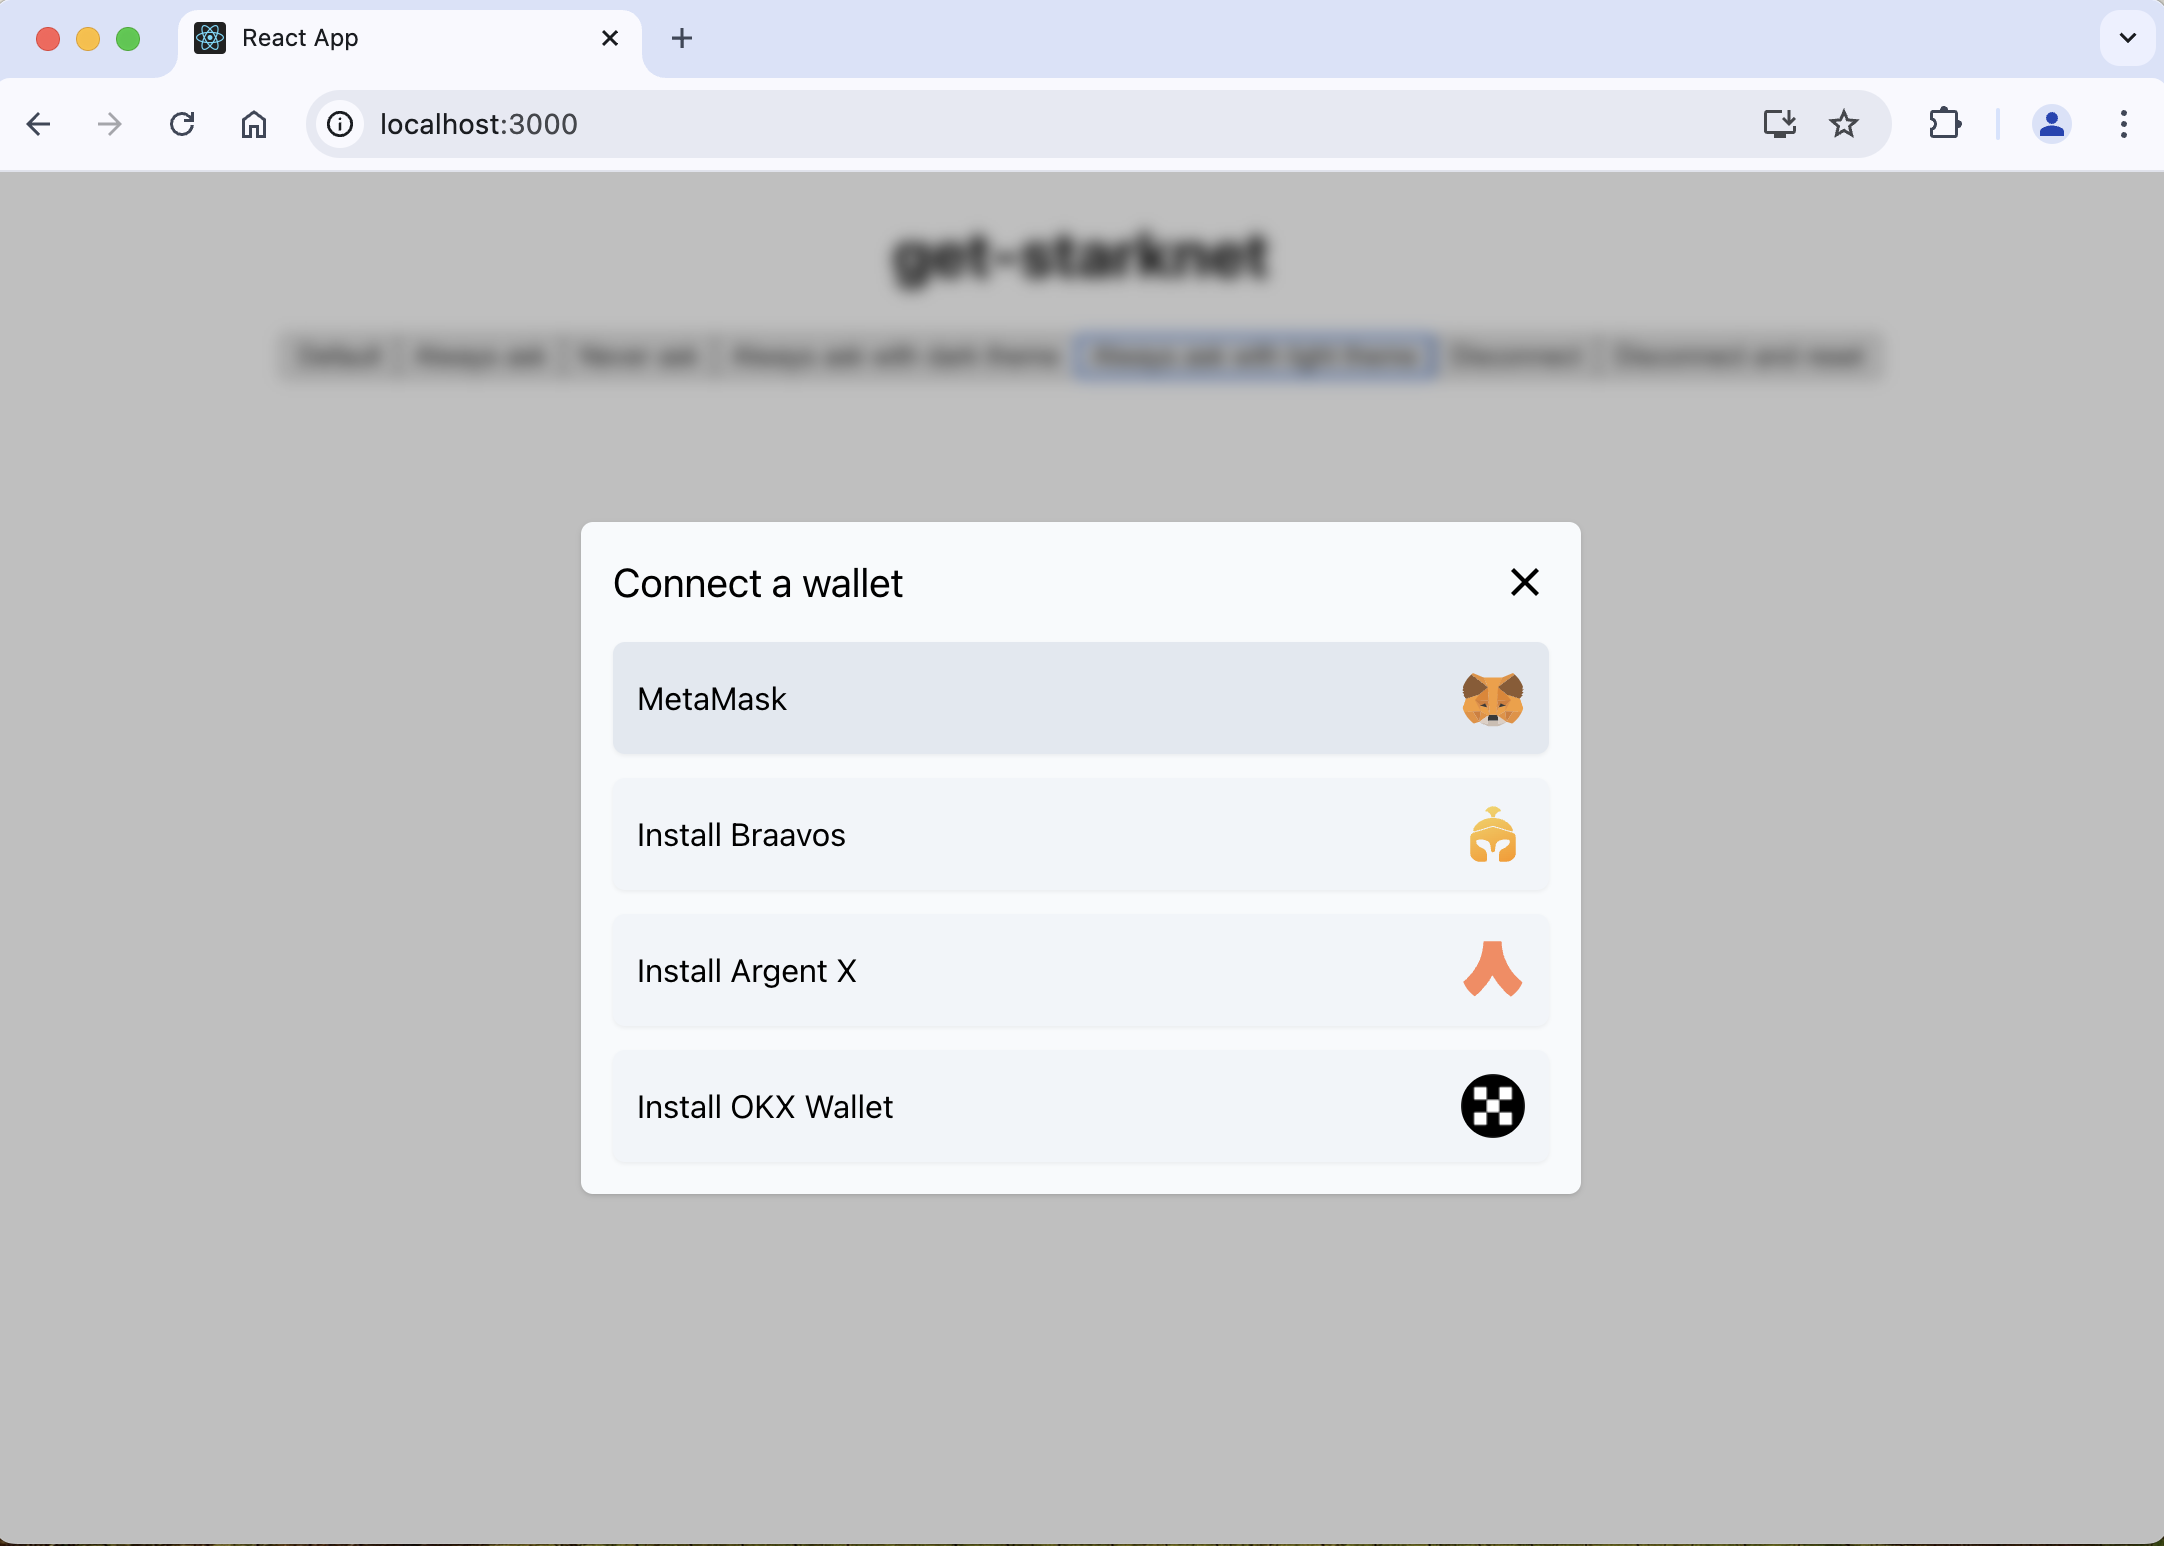
After you accept the terms in the prompts, your wallet will be successfully connected.
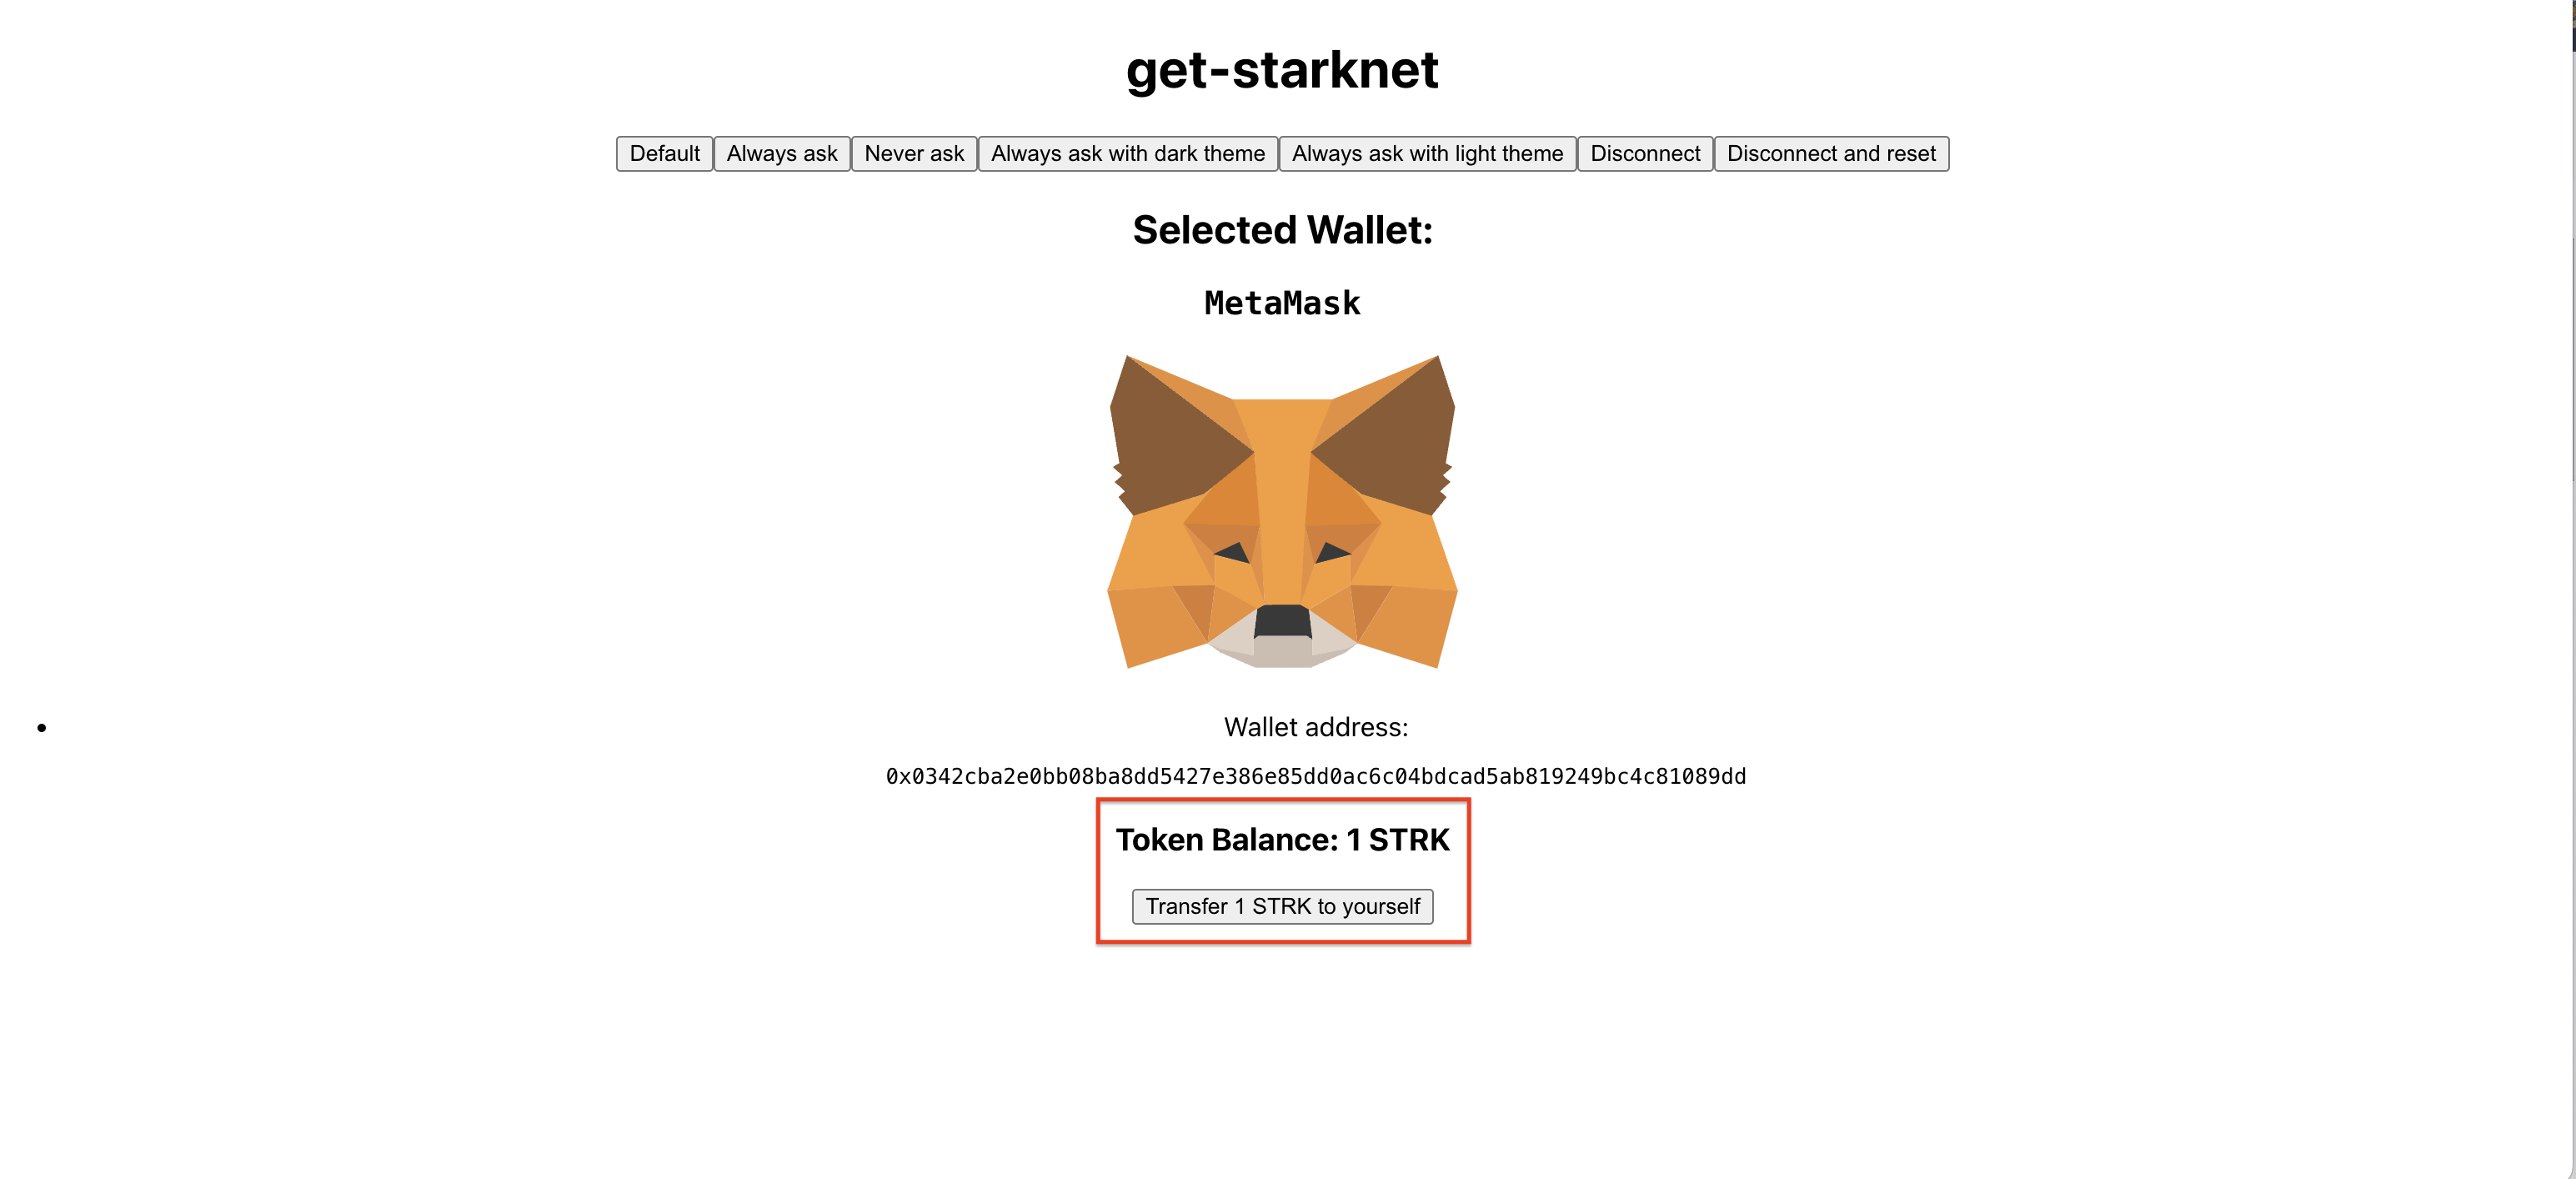
4. Display the balance of and transfer an ERC-20 token
Now that you have set up the basic interaction, you can display the balance of a specific ERC-20
token, such as STRK, and perform a transfer using the AccountInterface instance.
To complete the transfer, you'll need ETH for gas and at least 1 STRK token.
To complete this tutorial, you'll use the Starknet testnet. By default, the Snap operates on the Mainnet. To switch to the testnet:
- Obtain testnet ETH and STRK tokens from the Starknet faucet.
- Use the StarkNet Snap Companion dapp to switch to the testnet.
4.1. Set up the contract
Create a src/components/ directory and add the following files to it:
erc20Abi.json: A JSON file containing the ERC-20 token contract's Application Binary Interface (ABI).TokenBalanceAndTransfer.tsx: A React component file for handling token balance display and transfer operations.
The file structure of the src/ directory should look similar to the following:
src/
├── components/
│   ├── erc20Abi.json
│   └── TokenBalanceAndTransfer.tsx
└── ...
The following TokenBalanceAndTransfer.tsx example loads the ABI from erc20Abi.json:
import { Contract } from "starknet";
import erc20Abi from "./erc20Abi.json";

const tokenAddress = "0x049D36570D4e46f48e99674bd3fcc84644DdD6b96F7C741B1562B82f9e004dC7";

const erc20 = new Contract(erc20Abi, tokenAddress, AccountInterface);
The contract address for STRK (an ERC-20 toke") on Sepolia testnet is 0x049D36570D4e46f48e99674bd3fcc84644DdD6b96F7C741B1562B82f9e004dC7.
You can find the ABI of the ERC-20 contract on the Code tab in Voyager.
Ensure you call the token address in the TokenBalanceAndTransfer component.
{walletAccount &&
    <TokenBalanceAndTransfer account={walletAccount} tokenAddress="0x04718f5a0fc34cc1af16a1cdee98ffb20c31f5cd61d6ab07201858f4287c938d" />
}
4.2. Update App.tsx
Call the TokenBalanceAndTransfer component in App.tsx.
Add the followinwg to the header of App.tsx to import the component:
import { TokenBalanceAndTransfer } from "./components/TokenBalanceAndTransfer";
Ensure that the following code is added to App.tsx, where the TokenBalanceAndTransfer component is called with the token address:
{walletAccount &&
    <TokenBalanceAndTransfer account={walletAccount} tokenAddress="0x04718f5a0fc34cc1af16a1cdee98ffb20c31f5cd61d6ab07201858f4287c938d" />
}
4.3. Fetch the token balance
Call the balanceOf method to fetch the balance of the connected account:
const balance = await erc20.balanceOf(walletAddress);
const formattedBalance = balance / Math.pow(10, 18);
4.4. Transfer tokens
To transfer tokens, fill out the transfer method call and execute the transaction using the AccountInterface.
Use the following example for reference:
import { Call } from "starknet";

// Define the transfer parameters.
const recipientAddress = "0x78662e7352d062084b0010068b99288486c2d8b914f6e2a55ce945f8792c8b1";
const amountToTransfer = 1n * 10n ** 18n; // 1 token (assuming 18 decimals).

const transferCall: Call = erc20.populate("transfer", {
  recipient: recipientAddress,
  amount: amountToTransfer,
});

// Execute the transfer.
const { transaction_hash: transferTxHash } = await AccountInterface.execute(transferCall);

// Wait for the transaction to be accepted on Starknet.
await AccountInterface.waitForTransaction(transferTxHash);
4.5. Full example
The following a full example of displaying the balance of an ERC-20 token and performing a transfer:
- TokenBalanceAndTransfer.tsx
- erc20Abi.json
import { useEffect, useState } from "react";
import { AccountInterface, Call, Contract } from "starknet";
import erc20Abi from "./erc20Abi.json";

interface TokenBalanceAndTransferProps {
  account: AccountInterface;
  tokenAddress: string;
}

export function TokenBalanceAndTransfer({ account, tokenAddress }: TokenBalanceAndTransferProps) {
  const [balance, setBalance] = useState<number | null>(null);

  useEffect(() => {
    async function fetchBalance() {
      try {
        if (account) {
          const erc20 = new Contract(erc20Abi, tokenAddress, account);
          const result = await erc20.balanceOf(account.address) as bigint;

          const decimals = 18n;
          const formattedBalance = result / 10n ** decimals; // Adjust for decimals using BigInt arithmetic
          setBalance(Number(formattedBalance)); // Convert to a number for UI display
        }
      } catch (error) {
        console.error("Error fetching balance:", error);
      }
    }

    fetchBalance();
  }, [account, tokenAddress]);

  async function handleTransfer() {
    try {
      if (account) {
        const erc20 = new Contract(erc20Abi, tokenAddress, account);
        const recipientAddress = "0x01aef74c082e1d6a0ec786696a12a0a5147e2dd8da11eae2d9e0f86e5fdb84b5";
        const amountToTransfer = 1n * 10n ** 18n; // 1 token (in smallest units)

        // Populate transfer call
        const transferCall: Call = erc20.populate("transfer", [recipientAddress, amountToTransfer]);

        // Execute transfer
        const { transaction_hash: transferTxHash } = await account.execute([transferCall]);

        // Wait for the transaction to be accepted
        await account.waitForTransaction(transferTxHash);

        // Refresh balance after transfer
        const newBalance = await erc20.balanceOf(account.address) as bigint;
        setBalance(Number(newBalance / 10n ** 18n)); // Adjust for decimals
      }
    } catch (error) {
      console.error("Error during transfer:", error);
    }
  }

  return (
    <div>
      <h3>Token Balance: {balance !== null ? `${balance} STRK` : "Loading..."}</h3>
      <button onClick={handleTransfer}>Transfer 1 STRK</button>
    </div>
  );
}
[
{
"type": "impl",
"name": "MintableToken",
"interface_name": "src::mintable_token_interface::IMintableToken"
},
{
"type": "struct",
"name": "core::integer::u256",
"members": [
{
"name": "low",
"type": "core::integer::u128"
},
{
"name": "high",
"type": "core::integer::u128"
}
]
},
{
"type": "interface",
"name": "src::mintable_token_interface::IMintableToken",
"items": [
{
"type": "function",
"name": "permissioned_mint",
"inputs": [
{
"name": "account",
"type": "core::starknet::contract_address::ContractAddress"
},
{
"name": "amount",
"type": "core::integer::u256"
}
],
"outputs": [],
"state_mutability": "external"
},
{
"type": "function",
"name": "permissioned_burn",
"inputs": [
{
"name": "account",
"type": "core::starknet::contract_address::ContractAddress"
},
{
"name": "amount",
"type": "core::integer::u256"
}
],
"outputs": [],
"state_mutability": "external"
}
]
},
{
"type": "impl",
"name": "MintableTokenCamelImpl",
"interface_name": "src::mintable_token_interface::IMintableTokenCamel"
},
{
"type": "interface",
"name": "src::mintable_token_interface::IMintableTokenCamel",
"items": [
{
"type": "function",
"name": "permissionedMint",
"inputs": [
{
"name": "account",
"type": "core::starknet::contract_address::ContractAddress"
},
{
"name": "amount",
"type": "core::integer::u256"
}
],
"outputs": [],
"state_mutability": "external"
},
{
"type": "function",
"name": "permissionedBurn",
"inputs": [
{
"name": "account",
"type": "core::starknet::contract_address::ContractAddress"
},
{
"name": "amount",
"type": "core::integer::u256"
}
],
"outputs": [],
"state_mutability": "external"
}
]
},
{
"type": "impl",
"name": "Replaceable",
"interface_name": "src::replaceability_interface::IReplaceable"
},
{
"type": "struct",
"name": "core::array::Span::<core::felt252>",
"members": [
{
"name": "snapshot",
"type": "@core::array::Array::<core::felt252>"
}
]
},
{
"type": "struct",
"name": "src::replaceability_interface::EICData",
"members": [
{
"name": "eic_hash",
"type": "core::starknet::class_hash::ClassHash"
},
{
"name": "eic_init_data",
"type": "core::array::Span::<core::felt252>"
}
]
},
{
"type": "enum",
"name": "core::option::Option::<src::replaceability_interface::EICData>",
"variants": [
{
"name": "Some",
"type": "src::replaceability_interface::EICData"
},
{
"name": "None",
"type": "()"
}
]
},
{
"type": "enum",
"name": "core::bool",
"variants": [
{
"name": "False",
"type": "()"
},
{
"name": "True",
"type": "()"
}
]
},
{
"type": "struct",
"name": "src::replaceability_interface::ImplementationData",
"members": [
{
"name": "impl_hash",
"type": "core::starknet::class_hash::ClassHash"
},
{
"name": "eic_data",
"type": "core::option::Option::<src::replaceability_interface::EICData>"
},
{
"name": "final",
"type": "core::bool"
}
]
},
{
"type": "interface",
"name": "src::replaceability_interface::IReplaceable",
"items": [
{
"type": "function",
"name": "get_upgrade_delay",
"inputs": [],
"outputs": [
{
"type": "core::integer::u64"
}
],
"state_mutability": "view"
},
{
"type": "function",
"name": "get_impl_activation_time",
"inputs": [
{
"name": "implementation_data",
"type": "src::replaceability_interface::ImplementationData"
}
],
"outputs": [
{
"type": "core::integer::u64"
}
],
"state_mutability": "view"
},
{
"type": "function",
"name": "add_new_implementation",
"inputs": [
{
"name": "implementation_data",
"type": "src::replaceability_interface::ImplementationData"
}
],
"outputs": [],
"state_mutability": "external"
},
{
"type": "function",
"name": "remove_implementation",
"inputs": [
{
"name": "implementation_data",
"type": "src::replaceability_interface::ImplementationData"
}
],
"outputs": [],
"state_mutability": "external"
},
{
"type": "function",
"name": "replace_to",
"inputs": [
{
"name": "implementation_data",
"type": "src::replaceability_interface::ImplementationData"
}
],
"outputs": [],
"state_mutability": "external"
}
]
},
{
"type": "impl",
"name": "AccessControlImplExternal",
"interface_name": "src::access_control_interface::IAccessControl"
},
{
"type": "interface",
"name": "src::access_control_interface::IAccessControl",
"items": [
{
"type": "function",
"name": "has_role",
"inputs": [
{
"name": "role",
"type": "core::felt252"
},
{
"name": "account",
"type": "core::starknet::contract_address::ContractAddress"
}
],
"outputs": [
{
"type": "core::bool"
}
],
"state_mutability": "view"
},
{
"type": "function",
"name": "get_role_admin",
"inputs": [
{
"name": "role",
"type": "core::felt252"
}
],
"outputs": [
{
"type": "core::felt252"
}
],
"state_mutability": "view"
}
]
},
{
"type": "impl",
"name": "RolesImpl",
"interface_name": "src::roles_interface::IMinimalRoles"
},
{
"type": "interface",
"name": "src::roles_interface::IMinimalRoles",
"items": [
{
"type": "function",
"name": "is_governance_admin",
"inputs": [
{
"name": "account",
"type": "core::starknet::contract_address::ContractAddress"
}
],
"outputs": [
{
"type": "core::bool"
}
],
"state_mutability": "view"
},
{
"type": "function",
"name": "is_upgrade_governor",
"inputs": [
{
"name": "account",
"type": "core::starknet::contract_address::ContractAddress"
}
],
"outputs": [
{
"type": "core::bool"
}
],
"state_mutability": "view"
},
{
"type": "function",
"name": "register_governance_admin",
"inputs": [
{
"name": "account",
"type": "core::starknet::contract_address::ContractAddress"
}
],
"outputs": [],
"state_mutability": "external"
},
{
"type": "function",
"name": "remove_governance_admin",
"inputs": [
{
"name": "account",
"type": "core::starknet::contract_address::ContractAddress"
}
],
"outputs": [],
"state_mutability": "external"
},
{
"type": "function",
"name": "register_upgrade_governor",
"inputs": [
{
"name": "account",
"type": "core::starknet::contract_address::ContractAddress"
}
],
"outputs": [],
"state_mutability": "external"
},
{
"type": "function",
"name": "remove_upgrade_governor",
"inputs": [
{
"name": "account",
"type": "core::starknet::contract_address::ContractAddress"
}
],
"outputs": [],
"state_mutability": "external"
},
{
"type": "function",
"name": "renounce",
"inputs": [
{
"name": "role",
"type": "core::felt252"
}
],
"outputs": [],
"state_mutability": "external"
}
]
},
{
"type": "impl",
"name": "ERC20Impl",
"interface_name": "openzeppelin::token::erc20::interface::IERC20"
},
{
"type": "interface",
"name": "openzeppelin::token::erc20::interface::IERC20",
"items": [
{
"type": "function",
"name": "name",
"inputs": [],
"outputs": [
{
"type": "core::felt252"
}
],
"state_mutability": "view"
},
{
"type": "function",
"name": "symbol",
"inputs": [],
"outputs": [
{
"type": "core::felt252"
}
],
"state_mutability": "view"
},
{
"type": "function",
"name": "decimals",
"inputs": [],
"outputs": [
{
"type": "core::integer::u8"
}
],
"state_mutability": "view"
},
{
"type": "function",
"name": "total_supply",
"inputs": [],
"outputs": [
{
"type": "core::integer::u256"
}
],
"state_mutability": "view"
},
{
"type": "function",
"name": "balance_of",
"inputs": [
{
"name": "account",
"type": "core::starknet::contract_address::ContractAddress"
}
],
"outputs": [
{
"type": "core::integer::u256"
}
],
"state_mutability": "view"
},
{
"type": "function",
"name": "allowance",
"inputs": [
{
"name": "owner",
"type": "core::starknet::contract_address::ContractAddress"
},
{
"name": "spender",
"type": "core::starknet::contract_address::ContractAddress"
}
],
"outputs": [
{
"type": "core::integer::u256"
}
],
"state_mutability": "view"
},
{
"type": "function",
"name": "transfer",
"inputs": [
{
"name": "recipient",
"type": "core::starknet::contract_address::ContractAddress"
},
{
"name": "amount",
"type": "core::integer::u256"
}
],
"outputs": [
{
"type": "core::bool"
}
],
"state_mutability": "external"
},
{
"type": "function",
"name": "transfer_from",
"inputs": [
{
"name": "sender",
"type": "core::starknet::contract_address::ContractAddress"
},
{
"name": "recipient",
"type": "core::starknet::contract_address::ContractAddress"
},
{
"name": "amount",
"type": "core::integer::u256"
}
],
"outputs": [
{
"type": "core::bool"
}
],
"state_mutability": "external"
},
{
"type": "function",
"name": "approve",
"inputs": [
{
"name": "spender",
"type": "core::starknet::contract_address::ContractAddress"
},
{
"name": "amount",
"type": "core::integer::u256"
}
],
"outputs": [
{
"type": "core::bool"
}
],
"state_mutability": "external"
}
]
},
{
"type": "impl",
"name": "ERC20CamelOnlyImpl",
"interface_name": "openzeppelin::token::erc20::interface::IERC20CamelOnly"
},
{
"type": "interface",
"name": "openzeppelin::token::erc20::interface::IERC20CamelOnly",
"items": [
{
"type": "function",
"name": "totalSupply",
"inputs": [],
"outputs": [
{
"type": "core::integer::u256"
}
],
"state_mutability": "view"
},
{
"type": "function",
"name": "balanceOf",
"inputs": [
{
"name": "account",
"type": "core::starknet::contract_address::ContractAddress"
}
],
"outputs": [
{
"type": "core::integer::u256"
}
],
"state_mutability": "view"
},
{
"type": "function",
"name": "transferFrom",
"inputs": [
{
"name": "sender",
"type": "core::starknet::contract_address::ContractAddress"
},
{
"name": "recipient",
"type": "core::starknet::contract_address::ContractAddress"
},
{
"name": "amount",
"type": "core::integer::u256"
}
],
"outputs": [
{
"type": "core::bool"
}
],
"state_mutability": "external"
}
]
},
{
"type": "constructor",
"name": "constructor",
"inputs": [
{
"name": "name",
"type": "core::felt252"
},
{
"name": "symbol",
"type": "core::felt252"
},
{
"name": "decimals",
"type": "core::integer::u8"
},
{
"name": "initial_supply",
"type": "core::integer::u256"
},
{
"name": "recipient",
"type": "core::starknet::contract_address::ContractAddress"
},
{
"name": "permitted_minter",
"type": "core::starknet::contract_address::ContractAddress"
},
{
"name": "provisional_governance_admin",
"type": "core::starknet::contract_address::ContractAddress"
},
{
"name": "upgrade_delay",
"type": "core::integer::u64"
}
]
},
{
"type": "function",
"name": "increase_allowance",
"inputs": [
{
"name": "spender",
"type": "core::starknet::contract_address::ContractAddress"
},
{
"name": "added_value",
"type": "core::integer::u256"
}
],
"outputs": [
{
"type": "core::bool"
}
],
"state_mutability": "external"
},
{
"type": "function",
"name": "decrease_allowance",
"inputs": [
{
"name": "spender",
"type": "core::starknet::contract_address::ContractAddress"
},
{
"name": "subtracted_value",
"type": "core::integer::u256"
}
],
"outputs": [
{
"type": "core::bool"
}
],
"state_mutability": "external"
},
{
"type": "function",
"name": "increaseAllowance",
"inputs": [
{
"name": "spender",
"type": "core::starknet::contract_address::ContractAddress"
},
{
"name": "addedValue",
"type": "core::integer::u256"
}
],
"outputs": [
{
"type": "core::bool"
}
],
"state_mutability": "external"
},
{
"type": "function",
"name": "decreaseAllowance",
"inputs": [
{
"name": "spender",
"type": "core::starknet::contract_address::ContractAddress"
},
{
"name": "subtractedValue",
"type": "core::integer::u256"
}
],
"outputs": [
{
"type": "core::bool"
}
],
"state_mutability": "external"
},
{
"type": "event",
"name": "openzeppelin::token::erc20_v070::erc20::ERC20::Transfer",
"kind": "struct",
"members": [
{
"name": "from",
"type": "core::starknet::contract_address::ContractAddress",
"kind": "data"
},
{
"name": "to",
"type": "core::starknet::contract_address::ContractAddress",
"kind": "data"
},
{
"name": "value",
"type": "core::integer::u256",
"kind": "data"
}
]
},
{
"type": "event",
"name": "openzeppelin::token::erc20_v070::erc20::ERC20::Approval",
"kind": "struct",
"members": [
{
"name": "owner",
"type": "core::starknet::contract_address::ContractAddress",
"kind": "data"
},
{
"name": "spender",
"type": "core::starknet::contract_address::ContractAddress",
"kind": "data"
},
{
"name": "value",
"type": "core::integer::u256",
"kind": "data"
}
]
},
{
"type": "event",
"name": "src::replaceability_interface::ImplementationAdded",
"kind": "struct",
"members": [
{
"name": "implementation_data",
"type": "src::replaceability_interface::ImplementationData",
"kind": "data"
}
]
},
{
"type": "event",
"name": "src::replaceability_interface::ImplementationRemoved",
"kind": "struct",
"members": [
{
"name": "implementation_data",
"type": "src::replaceability_interface::ImplementationData",
"kind": "data"
}
]
},
{
"type": "event",
"name": "src::replaceability_interface::ImplementationReplaced",
"kind": "struct",
"members": [
{
"name": "implementation_data",
"type": "src::replaceability_interface::ImplementationData",
"kind": "data"
}
]
},
{
"type": "event",
"name": "src::replaceability_interface::ImplementationFinalized",
"kind": "struct",
"members": [
{
"name": "impl_hash",
"type": "core::starknet::class_hash::ClassHash",
"kind": "data"
}
]
},
{
"type": "event",
"name": "src::access_control_interface::RoleGranted",
"kind": "struct",
"members": [
{
"name": "role",
"type": "core::felt252",
"kind": "data"
},
{
"name": "account",
"type": "core::starknet::contract_address::ContractAddress",
"kind": "data"
},
{
"name": "sender",
"type": "core::starknet::contract_address::ContractAddress",
"kind": "data"
}
]
},
{
"type": "event",
"name": "src::access_control_interface::RoleRevoked",
"kind": "struct",
"members": [
{
"name": "role",
"type": "core::felt252",
"kind": "data"
},
{
"name": "account",
"type": "core::starknet::contract_address::ContractAddress",
"kind": "data"
},
{
"name": "sender",
"type": "core::starknet::contract_address::ContractAddress",
"kind": "data"
}
]
},
{
"type": "event",
"name": "src::access_control_interface::RoleAdminChanged",
"kind": "struct",
"members": [
{
"name": "role",
"type": "core::felt252",
"kind": "data"
},
{
"name": "previous_admin_role",
"type": "core::felt252",
"kind": "data"
},
{
"name": "new_admin_role",
"type": "core::felt252",
"kind": "data"
}
]
},
{
"type": "event",
"name": "src::roles_interface::GovernanceAdminAdded",
"kind": "struct",
"members": [
{
"name": "added_account",
"type": "core::starknet::contract_address::ContractAddress",
"kind": "data"
},
{
"name": "added_by",
"type": "core::starknet::contract_address::ContractAddress",
"kind": "data"
}
]
},
{
"type": "event",
"name": "src::roles_interface::GovernanceAdminRemoved",
"kind": "struct",
"members": [
{
"name": "removed_account",
"type": "core::starknet::contract_address::ContractAddress",
"kind": "data"
},
{
"name": "removed_by",
"type": "core::starknet::contract_address::ContractAddress",
"kind": "data"
}
]
},
{
"type": "event",
"name": "src::roles_interface::UpgradeGovernorAdded",
"kind": "struct",
"members": [
{
"name": "added_account",
"type": "core::starknet::contract_address::ContractAddress",
"kind": "data"
},
{
"name": "added_by",
"type": "core::starknet::contract_address::ContractAddress",
"kind": "data"
}
]
},
{
"type": "event",
"name": "src::roles_interface::UpgradeGovernorRemoved",
"kind": "struct",
"members": [
{
"name": "removed_account",
"type": "core::starknet::contract_address::ContractAddress",
"kind": "data"
},
{
"name": "removed_by",
"type": "core::starknet::contract_address::ContractAddress",
"kind": "data"
}
]
},
{
"type": "event",
"name": "openzeppelin::token::erc20_v070::erc20::ERC20::Event",
"kind": "enum",
"variants": [
{
"name": "Transfer",
"type": "openzeppelin::token::erc20_v070::erc20::ERC20::Transfer",
"kind": "nested"
},
{
"name": "Approval",
"type": "openzeppelin::token::erc20_v070::erc20::ERC20::Approval",
"kind": "nested"
},
{
"name": "ImplementationAdded",
"type": "src::replaceability_interface::ImplementationAdded",
"kind": "nested"
},
{
"name": "ImplementationRemoved",
"type": "src::replaceability_interface::ImplementationRemoved",
"kind": "nested"
},
{
"name": "ImplementationReplaced",
"type": "src::replaceability_interface::ImplementationReplaced",
"kind": "nested"
},
{
"name": "ImplementationFinalized",
"type": "src::replaceability_interface::ImplementationFinalized",
"kind": "nested"
},
{
"name": "RoleGranted",
"type": "src::access_control_interface::RoleGranted",
"kind": "nested"
},
{
"name": "RoleRevoked",
"type": "src::access_control_interface::RoleRevoked",
"kind": "nested"
},
{
"name": "RoleAdminChanged",
"type": "src::access_control_interface::RoleAdminChanged",
"kind": "nested"
},
{
"name": "GovernanceAdminAdded",
"type": "src::roles_interface::GovernanceAdminAdded",
"kind": "nested"
},
{
"name": "GovernanceAdminRemoved",
"type": "src::roles_interface::GovernanceAdminRemoved",
"kind": "nested"
},
{
"name": "UpgradeGovernorAdded",
"type": "src::roles_interface::UpgradeGovernorAdded",
"kind": "nested"
},
{
"name": "UpgradeGovernorRemoved",
"type": "src::roles_interface::UpgradeGovernorRemoved",
"kind": "nested"
}
]
}
]
4.6. Start the dapp
Start the dapp and navigate to it in your browser.
yarn start
Next steps
You've set up a simple React dapp that connects to MetaMask, displays an ERC-20 token balance, and performs token transfers. Creating a contract instance using AccountInterface allows you to interact with smart contracts, retrieve token balances, and execute transactions, enabling more advanced functionality in your dapp.
You can follow these next steps: